Gemini CLI 发布
¥Gemini CLI Releases
发布节奏和标签
¥Release Cadence and Tags
我们将尽可能严格遵循 https://semver.org/ 的规范,但如需更改或调整,我们会另行通知。我们每周的发布将以小版本增量形式进行,任何版本间的 bug 或 hotfix 都将作为最新版本的补丁版本发布。
¥We will follow https://semver.org/ as closely as possible but will call out when or if we have to deviate from it. Our weekly releases will be minor version increments and any bug or hotfixes btween releases will go out as patch versions on the most recent release.
预览
¥Preview
新的预览版本将于每周二 UTC 时间 23:59 发布。这些版本可能尚未经过全面审核,可能包含回归问题或其他未解决的问题。请帮助我们测试和安装preview标签。
¥New preview releases will be published each week at UTC 2359 on Tuesdays. These releases will not have been fully vetted and may contain regressions or other outstanding issues. Please help us test and install with preview tag.
npm install -g @google/gemini-cli@preview
稳定的
¥Stable
新的稳定版本将于每周二 UTC 时间 20:00 发布,这将是上周发布的全面推广,以及所有错误修复和验证。使用
latest标签。¥New stable releases will be published each week at UTC 2000 on Tuesdays, this will be the full promotion of last week's release + any bug fixes and validations. Use
latesttag.
npm install -g @google/gemini-cli@latest
每晚
¥Nightly
新版本将于每周 UTC 时间 00:00 发布,所有变更均基于主分支发布时的状态。假设存在待处理的验证和问题。使用
nightly标签。¥New releases will be published each week at UTC 0000 each day, This will be all changes from the main branch as represted at time of release. It should be assumed there are pending validations and issues. Use
nightlytag.
npm install -g @google/gemini-cli@nightly
发布流程。
¥Release Process.
在哪里x.y.z是即将发布的下一个版本。在大多数情况下,对于每周发布,这将是一个增量y又称次要版本更新。主要版本更新x需要更广泛的协调和沟通。对于补丁z见下文。如果可能,我们将尽力遵守 https://semver.org/
¥Where x.y.z is the next version to be released. In most all cases for the weekly release this will be an increment on y, aka minor version update. Major version updates x will need broader coordination and communication. For patches z see below. When possible we will do our best to adher to https://semver.org/
我们的发布节奏是:新版本会在预览频道发布一周,然后在一周后升级到稳定版本。版本号将遵循语义化版本 (SemVer) 规则,每周发布一次,小版本号递增。预览版和稳定版的补丁和错误修复都会递增补丁版本号。
¥Our release cadence is new releases are sent to a preview channel for a week and then promoted to stable after a week. Version numbers will follow SemVer with weekly releases incrementing the minor version. Patches and bug fixes to both preview and stable releases will increment the patch version.
夜间发布
¥Nightly Release
每晚 UTC 0000,我们将自动部署夜间版本main。这将是下一个生产版本 xyz,带有 nightly 标签。
¥Each night at UTC 0000 we will auto deploy a nightly release from main. This will be a version of the next production release, x.y.z, with the nightly tag.
创建预览版本
¥Create Preview Release
每周二 UTC 2359,我们将自动部署下一个生产版本 xyz 的预览版本
¥Each Tuesday at UTC 2359 we will auto deploy a preview release of the next production release x.y.z.
这将作为“发布”操作的预定实例发生。它将从主任务中切断。
¥This will happen as a scheduled instance of the ‘release’ action. It will be cut off of Main.
这将创建一个分支
release/vx.y.z-preview.n¥This will create a branch
release/vx.y.z-preview.n我们将针对此分支和 npm 软件包进行评估和冒烟测试。目前这应该是手动冒烟测试,我们没有专门的矩阵或具体的详细流程。我们即将推出一些工作,使测试更加规范化和自动化,请参阅 https://github.com/google-gemini/gemini-cli/issues/3788
¥We will run evals and smoke testing against this branch and the npm package. For now this should be manual smoke testing, we don't have a dedicated matrix or specific detailed process. There is work coming soon to make this more formalized and automatic see https://github.com/google-gemini/gemini-cli/issues/3788
用户安装
@preview也将获得此版本¥Users installing
@previewwill get this release as well
推广稳定版本
¥Promote Stable Release
一周后(下周二),所有信号均正常,我们将于世界标准时间 20:00 通过当前值班人员手动发布。
¥After one week (On the following Tuesday) with all signals a go, we will manually release at 2000 UTC via the current on-call person.
发布操作将与源分支一起使用
release/vx.y.z-preview.n¥The release action will be used with the source branch as
release/vx.y.z-preview.n版本将是 xyz
¥The version will be x.y.z
发布者将创建一个 pr 并将其与版本更改合并到主要版本中。
¥The releaser will create and merge a pr into main with the version changes.
我们将进行冒烟测试和手动验证。目前这应该是手动冒烟测试,我们没有专门的矩阵或具体的详细流程。我们即将推出一些工作,使这项工作更加规范化和自动化,详情请参阅 https://github.com/google-gemini/gemini-cli/issues/3788
¥Smoke tests and manual validation will be run. For now this should be manual smoke testing, we don't have a dedicated matrix or specific detailed process. There is work coming soon to make this more formalized and automatic see https://github.com/google-gemini/gemini-cli/issues/3788
修补版本
¥Patching Releases
如果需要在下一次预定发布之前修复严重错误,请按照此流程创建补丁。
¥If a critical bug needs to be fixed before the next scheduled release, follow this process to create a patch.
1. 创建 Hotfix 分支
¥1. Create a Hotfix Branch
首先,为你的修复创建一个新的分支。此分支的来源取决于你修补的是稳定版本还是预览版本。
¥First, create a new branch for your fix. The source for this branch depends on whether you are patching a stable or a preview release.
对于稳定发布补丁:从需要修补的版本的 Git 标签创建一个分支。标签名称的格式如下:
vx.y.z。¥For a stable release patch: Create a branch from the Git tag of the version you need to patch. Tag names are formatted as
vx.y.z.
bash
  # Example: Create a hotfix branch for v0.2.0
  git checkout v0.2.0 -b hotfix/issue-123-fix-for-v0.2.0
¥bash
# Example: Create a hotfix branch for v0.2.0
git checkout v0.2.0 -b hotfix/issue-123-fix-for-v0.2.0
对于预览版本补丁:从现有的预览版本分支创建一个分支,格式为
release/vx.y.z-preview.n。¥For a preview release patch: Create a branch from the existing preview release branch, which is formatted as
release/vx.y.z-preview.n.
bash
  # Example: Create a hotfix branch for a preview release
  git checkout release/v0.2.0-preview.0 && git checkout -b hotfix/issue-456-fix-for-preview
¥bash
# Example: Create a hotfix branch for a preview release
git checkout release/v0.2.0-preview.0 && git checkout -b hotfix/issue-456-fix-for-preview
2. 实施修复
¥2. Implement the Fix
在新的修复分支中,要么创建一个包含修复内容的新提交,要么从现有提交中挑选一个main分支。将您的更改合并到修补程序分支的源代码中(例如:https://github.com/google-gemini/gemini-cli/pull/6850)。
¥In your new hotfix branch, either create a new commit with the fix or cherry-pick an existing commit from the main branch. Merge your changes into the source of the hotfix branch (ex. https://github.com/google-gemini/gemini-cli/pull/6850).
3. 执行发布
¥3. Perform the Release
使用“发布” GitHub Actions 工作流程遵循手动发布流程。
¥Follow the manual release process using the "Release" GitHub Actions workflow.
版本:对于稳定的补丁,增加补丁版本(例如,
v0.2.0->v0.2.1)。对于预览补丁,增加预览编号(例如,v0.2.0-preview.0->v0.2.0-preview.1)。¥Version: For stable patches, increment the patch version (e.g.,
v0.2.0->v0.2.1). For preview patches, increment the preview number (e.g.,v0.2.0-preview.0->v0.2.0-preview.1).参考:使用您的源分支作为参考(例如
release/v0.2.0-preview.0)¥Ref: Use your source branch as the reference (ex.
release/v0.2.0-preview.0)
4.更新版本
¥4. Update Versions
修复程序发布后,将更改合并回相应的分支。
¥After the hotfix is released, merge the changes back to the appropriate branch.
-
对于稳定版本的修补程序:打开拉取请求以合并发布分支(例如,
release/0.2.1)回到main。这将保留版本号main最新。¥For a stable release hotfix: Open a pull request to merge the release branch (e.g.,
release/0.2.1) back intomain. This keeps the version number inmainup to date. -
对于预览版修补程序:打开拉取请求以合并新的预览版本分支(例如,
release/v0.2.0-preview.1)返回到现有的预览版本分支(release/v0.2.0-preview.0)(例如 https://github.com/google-gemini/gemini-cli/pull/6868)¥For a preview release hotfix: Open a pull request to merge the new preview release branch (e.g.,
release/v0.2.0-preview.1) back into the existing preview release branch (release/v0.2.0-preview.0) (ex. https://github.com/google-gemini/gemini-cli/pull/6868)
发布时间表
¥Release Schedule
日期 ¥Date |
稳定 UTC 2000 ¥Stable UTC 2000 |
预览 UTC 2359 ¥Preview UTC 2359 |
2025年8月19日 ¥Aug 19th, 2025 |
不适用 ¥N/A |
0.2.0-预览.0 ¥0.2.0-preview.0 |
2025年8月26日 ¥Aug 26th, 2025 |
0.2.0 ¥0.2.0 |
0.3.0-预览.0 ¥0.3.0-preview.0 |
2025年9月2日 ¥Sep 2nd, 2025 |
0.3.0 ¥0.3.0 |
0.4.0-预览.0 ¥0.4.0-preview.0 |
2025年9月9日 ¥Sep 9th, 2025 |
0.4.0 ¥0.4.0 |
0.5.0-预览.0 ¥0.5.0-preview.0 |
2025年9月16日 ¥Sep 16th, 2025 |
0.5.0 ¥0.5.0 |
0.6.0-预览.0 ¥0.6.0-preview.0 |
2025年9月23日 ¥Sep 23rd, 2025 |
0.6.0 ¥0.6.0 |
0.7.0-预览.0 ¥0.7.0-preview.0 |
如何释放
¥How To Release
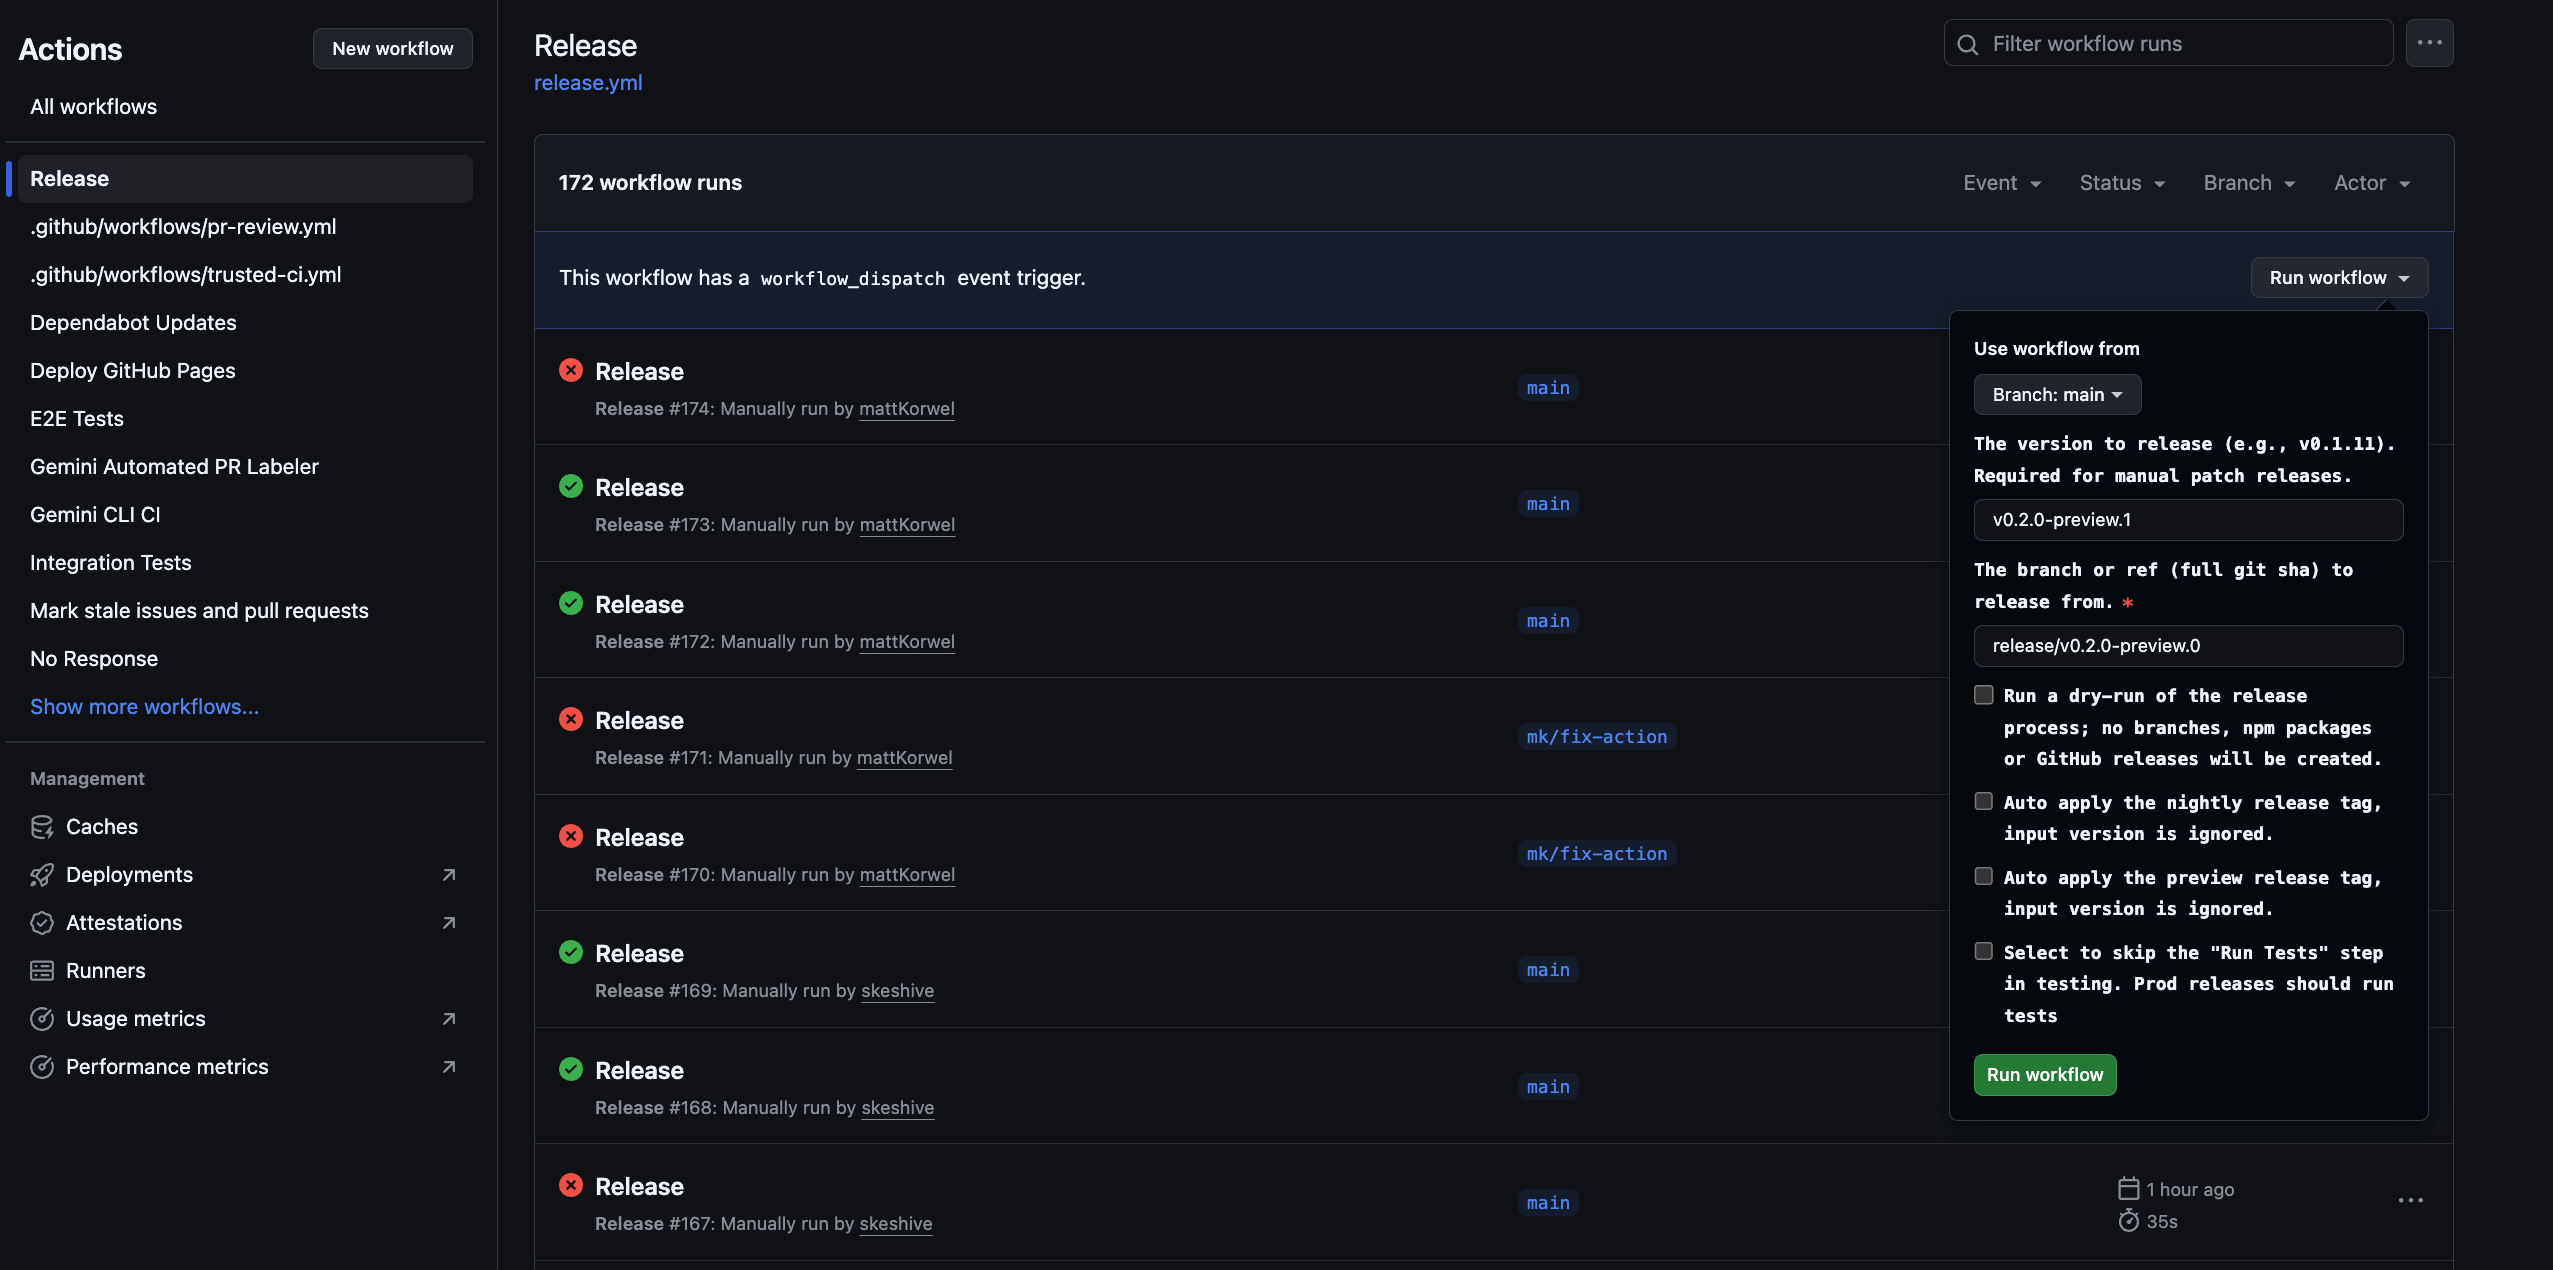
发布通过发布.ymlGitHub Actions 工作流程。要执行补丁或修补程序的手动发布:
¥Releases are managed through the release.yml GitHub Actions workflow. To perform a manual release for a patch or hotfix:
导航至行动存储库的选项卡。
¥Navigate to the Actions tab of the repository.
选择发布列表中的工作流程。
¥Select the Release workflow from the list.
点击运行工作流下拉按钮。
¥Click the Run workflow dropdown button.
填写所需的输入:
¥Fill in the required inputs:
版本:要发布的确切版本(例如,
v0.2.1)。¥Version: The exact version to release (e.g.,
v0.2.1).参考:要发布的分支或提交 SHA(默认为
main)。¥Ref: The branch or commit SHA to release from (defaults to
main).试运行:保留原样
true测试工作流程而不发布,或设置为false进行现场发布。¥Dry Run: Leave as
trueto test the workflow without publishing, or set tofalseto perform a live release.
点击运行工作流。
¥Click Run workflow.
TLDR
¥TLDR
每次发布(无论是自动发布还是手动发布)都会执行以下步骤:
¥Each release, wether automated or manual performs the following steps:
从
main分支。¥Checks out the latest code from the
mainbranch.安装所有依赖项。
¥Installs all dependencies.
运行全套
preflight检查和集成测试。¥Runs the full suite of
preflightchecks and integration tests.如果所有测试都成功,它会根据输入计算下一个版本号。
¥If all tests succeed, it calculates the next version number based on the inputs.
它创建一个分支名称
release/${VERSION}。¥It creates a branch name
release/${VERSION}.它创建一个标签名称
v${VERSION}。¥It creates a tag name
v${VERSION}.然后,它使用提供的版本号构建并发布包到 npm。
¥It then builds and publishes the packages to npm with the provided version number.
最后,它为该版本创建一个 GitHub Release。
¥Finally, it creates a GitHub Release for the version.
故障处理
¥Failure Handling
如果工作流程中的任何步骤失败,它将自动在存储库中创建一个带有标签的新问题bug和release-failure。该问题将包含失败的工作流运行的链接,以便于调试。
¥If any step in the workflow fails, it will automatically create a new issue in the repository with the labels bug and release-failure. The issue will contain a link to the failed workflow run for easy debugging.
Docker
¥Docker
我们还运行了一个名为“发布-docker.yml这会发布与你的版本匹配的沙盒 Docker 文件。一旦服务帐户权限得到解决,它也将被移动到 GH 并与主发布文件合并。
¥We also run a Google cloud build called release-docker.yml. Which publishes the sandbox docker to match your release. This will also be moved to GH and combined with the main release file once service account permissions are sorted out.
发布验证
¥Release Validation
发布新版本后,应该进行冒烟测试,以确保软件包能够按预期运行。您可以通过在本地安装软件包并运行一系列测试来确保它们正常运行。
¥After pushing a new release smoke testing should be performed to ensure that the packages are working as expected. This can be done by installing the packages locally and running a set of tests to ensure that they are functioning correctly.
npx -y @google/gemini-cli@latest --version如果你没有执行 rc 或 dev 标签,则验证推送是否按预期工作¥
npx -y @google/gemini-cli@latest --versionto validate the push worked as expected if you were not doing a rc or dev tagnpx -y @google/gemini-cli@<release tag> --version验证标签是否被正确推送¥
npx -y @google/gemini-cli@<release tag> --versionto validate the tag pushed appropriately这在当地具有破坏性
npm uninstall @google/gemini-cli && npm uninstall -g @google/gemini-cli && npm cache clean --force && npm install @google/gemini-cli@<version>¥This is destructive locally
npm uninstall @google/gemini-cli && npm uninstall -g @google/gemini-cli && npm cache clean --force && npm install @google/gemini-cli@<version>建议进行冒烟测试(即基本操作,例如运行一些 LLM 命令和工具),以确保软件包能够按预期运行。我们将在未来进一步完善这方面的规范。
¥Smoke testing a basic run through of exercising a few llm commands and tools is recommended to ensure that the packages are working as expected. We'll codify this more in the future.
本地测试和验证:包装和发布流程的变更
¥Local Testing and Validation: Changes to the Packaging and Publishing Process
如果您需要测试发布过程而不实际发布到 NPM 或创建公共 GitHub 版本,则可以从 GitHub UI 手动触发工作流程。
¥If you need to test the release process without actually publishing to NPM or creating a public GitHub release, you can trigger the workflow manually from the GitHub UI.
前往“操作”选项卡存储库。
¥Go to the Actions tab of the repository.
单击“运行工作流程”下拉菜单。
¥Click on the "Run workflow" dropdown.
离开
dry_run选项已选中(true)。¥Leave the
dry_runoption checked (true).单击“运行工作流程”按钮。
¥Click the "Run workflow" button.
这将运行整个发布过程,但会跳过npm publish和gh release create步骤。您可以检查工作流日志,以确保一切按预期进行。
¥This will run the entire release process but will skip the npm publish and gh release create steps. You can inspect the workflow logs to ensure everything is working as expected.
在提交任何打包和发布流程的变更之前,务必在本地进行测试。这可以确保软件包能够正确发布,并在用户安装后正常工作。
¥It is crucial to test any changes to the packaging and publishing process locally before committing them. This ensures that the packages will be published correctly and that they will work as expected when installed by a user.
为了验证你的更改,你可以对发布过程进行一次试运行。这将模拟发布过程,而无需真正将包发布到 npm 仓库。
¥To validate your changes, you can perform a dry run of the publishing process. This will simulate the publishing process without actually publishing the packages to the npm registry.
npm_package_version=9.9.9 SANDBOX_IMAGE_REGISTRY="registry" SANDBOX_IMAGE_NAME="thename" npm run publish:npm --dry-run
此命令将执行以下操作:
¥This command will do the following:
构建所有包。
¥Build all the packages.
运行所有预发布脚本。
¥Run all the prepublish scripts.
创建将发布到 npm 的包 tarball。
¥Create the package tarballs that would be published to npm.
打印将要发布的软件包的摘要。
¥Print a summary of the packages that would be published.
然后,您可以检查生成的 tarball,以确保它们包含正确的文件,并且package.json文件已正确更新。tarball 将在每个软件包的根目录中创建(例如,packages/cli/google-gemini-cli-0.1.6.tgz)。
¥You can then inspect the generated tarballs to ensure that they contain the correct files and that the package.json files have been updated correctly. The tarballs will be created in the root of each package's directory (e.g., packages/cli/google-gemini-cli-0.1.6.tgz).
通过执行试运行,您可以确信对打包过程的更改是正确的,并且包将被成功发布。
¥By performing a dry run, you can be confident that your changes to the packaging process are correct and that the packages will be published successfully.
发布深度探究
¥Release Deep Dive
发布过程的主要目标是从 packages/ 目录中获取源代码,构建它,并在临时目录中组装一个干净、独立的包bundle项目根目录中。这bundle目录才是真正发布到 NPM 的内容。
¥The main goal of the release process is to take the source code from the packages/ directory, build it, and assemble a
clean, self-contained package in a temporary bundle directory at the root of the project. This bundle directory is what
actually gets published to NPM.
以下是关键阶段:
¥Here are the key stages:
第一阶段:发布前的健全性检查和版本控制
¥Stage 1: Pre-Release Sanity Checks and Versioning
会发生什么:在移动任何文件之前,该过程会确保项目处于良好状态。这包括运行测试、代码检查和类型检查(npm run preflight)。根 package.json 和 packages/cli/package.json 中的版本号将更新为新的发布版本。
¥What happens: Before any files are moved, the process ensures the project is in a good state. This involves running tests, linting, and type-checking (npm run preflight). The version number in the root package.json and packages/cli/package.json is updated to the new release version.
原因:这保证了只发布高质量、可运行的代码。版本控制是标记新版本的第一步。
¥Why: This guarantees that only high-quality, working code is released. Versioning is the first step to signify a new release.
第二阶段:构建源代码
¥Stage 2: Building the Source Code
发生了什么:packages/core/src 和 packages/cli/src 中的 TypeScript 源代码被编译成 JavaScript。
¥What happens: The TypeScript source code in packages/core/src and packages/cli/src is compiled into JavaScript.
文件移动:
¥File movement:
包/核心/src/*/.ts -> 编译到 -> packages/core/dist/
¥packages/core/src/*/.ts -> compiled to -> packages/core/dist/
包/cli/src/*/.ts -> 编译为 -> packages/cli/dist/
¥packages/cli/src/*/.ts -> compiled to -> packages/cli/dist/
原因:开发过程中编写的 TypeScript 代码需要转换为 Node.js 可以运行的纯 JavaScript。由于 cli 包依赖于 core 包,因此需要先构建 core 包。
¥Why: The TypeScript code written during development needs to be converted into plain JavaScript that can be run by Node.js. The core package is built first as the cli package depends on it.
第三阶段:组装最终可发布包
¥Stage 3: Assembling the Final Publishable Package
这是最关键的阶段,文件在此阶段被移动并转换为最终发布状态。临时bundle在项目根目录创建文件夹来存放最终的包内容。
¥This is the most critical stage where files are moved and transformed into their final state for publishing. A temporary
bundle folder is created at the project root to house the final package contents.
-
这
package.json已转换:¥The
package.jsonis Transformed:发生了什么:packages/cli/ 中的 package.json 被读取、修改并写入根目录
bundle/ 目录。¥What happens: The package.json from packages/cli/ is read, modified, and written into the root
bundle/ directory.文件移动:packages/cli/package.json -> (内存转换) ->
bundle/package.json¥File movement: packages/cli/package.json -> (in-memory transformation) ->
bundle/package.json原因:最终的 package.json 必须与开发中使用的不同。主要变更包括:
¥Why: The final package.json must be different from the one used in development. Key changes include:
删除 devDependencies。
¥Removing devDependencies.
删除特定于工作区的“依赖项”:{“@gemini-cli/core”:“workspace:*”}并确保核心代码直接捆绑到最终的 JavaScript 文件中。
¥Removing workspace-specific "dependencies": { "@gemini-cli/core": "workspace:*" } and ensuring the core code is bundled directly into the final JavaScript file.
确保 bin、main 和 files 字段指向最终包结构中的正确位置。
¥Ensuring the bin, main, and files fields point to the correct locations within the final package structure.
-
JavaScript 包已创建:
¥The JavaScript Bundle is Created:
发生了什么:从 packages/core/dist 和 packages/cli/dist 构建的 JavaScript 被捆绑成一个可执行的 JavaScript 文件。
¥What happens: The built JavaScript from both packages/core/dist and packages/cli/dist are bundled into a single, executable JavaScript file.
文件移动:packages/cli/dist/index.js + packages/core/dist/index.js ->(由 esbuild 捆绑)->
bundle/gemini.js(或类似名称)。¥File movement: packages/cli/dist/index.js + packages/core/dist/index.js -> (bundled by esbuild) ->
bundle/gemini.js (or a similar name).原因:这会创建一个包含所有必要应用程序代码的单一优化文件。由于核心包的代码现在直接包含在 NPM 中,因此无需再单独依赖核心包,从而简化了软件包的构建。
¥Why: This creates a single, optimized file that contains all the necessary application code. It simplifies the package by removing the need for the core package to be a separate dependency on NPM, as its code is now included directly.
-
复制静态文件和支持文件:
¥Static and Supporting Files are Copied:
发生了什么:不属于源代码但对于包正常工作或详细描述所必需的基本文件被复制到
bundle目录。¥What happens: Essential files that are not part of the source code but are required for the package to work correctly or be well-described are copied into the
bundledirectory.文件移动:
¥File movement:
自述文件.md->
bundle/README.md¥README.md ->
bundle/README.md许可证 ->
bundle/执照¥LICENSE ->
bundle/LICENSEpackages/cli/src/utils/*.sb (沙盒配置文件) ->
bundle/¥packages/cli/src/utils/*.sb (sandbox profiles) ->
bundle/为什么:
¥Why:
README.md 和 LICENSE 是任何 NPM 包中都应包含的标准文件。
¥The README.md and LICENSE are standard files that should be included in any NPM package.
沙盒配置文件(.sb 文件)是 CLI 沙盒功能正常运行所需的关键运行时资产。它们必须位于最终可执行文件旁边。
¥The sandbox profiles (.sb files) are critical runtime assets required for the CLI's sandboxing feature to function. They must be located next to the final executable.
第四阶段:发布到NPM
¥Stage 4: Publishing to NPM
发生了什么:npm publish 命令从根目录运行
bundle目录。¥What happens: The npm publish command is run from inside the root
bundledirectory.原因:通过从
bundle目录中,只有我们在第 3 阶段精心组装的文件才会上传到 NPM 注册表。这可以防止任何源代码、测试文件或开发配置被意外发布,从而为用户提供一个干净、精简的软件包。¥Why: By running npm publish from within the
bundledirectory, only the files we carefully assembled in Stage 3 are uploaded to the NPM registry. This prevents any source code, test files, or development configurations from being accidentally published, resulting in a clean and minimal package for users.
文件流摘要
¥Summary of File Flow
graph TD
    subgraph "Source Files"
        A["packages/core/src/*.ts<br/>packages/cli/src/*.ts"]
        B["packages/cli/package.json"]
        C["README.md<br/>LICENSE<br/>packages/cli/src/utils/*.sb"]
    end

    subgraph "Process"
        D(Build)
        E(Transform)
        F(Assemble)
        G(Publish)
    end

    subgraph "Artifacts"
        H["Bundled JS"]
        I["Final package.json"]
        J["bundle/"]
    end

    subgraph "Destination"
        K["NPM Registry"]
    end

    A --> D --> H
    B --> E --> I
    C --> F
    H --> F
    I --> F
    F --> J
    J --> G --> K
此过程确保最终发布的工件是项目的专用、干净且高效的表示,而不是开发工作区的直接副本。
¥This process ensures that the final published artifact is a purpose-built, clean, and efficient representation of the project, rather than a direct copy of the development workspace.